Sections are used in conjunction with Frames and Print If statements to cycle through and print line items on a layout. Sections use the line item's line type attribute to identify which line items to print when and with what formatting. As such, it is essential to create expressions (Print If statements) for each line type so that line items are only printed once on the layout.
There are 10 line type constants that can be used when building Print If statements including:
1.CON.TypeComment - Comment line type
2.CON.TypeGroupHeader - Group Header line type
3.CON.TypeHeading - Heading line type
4.CON.TypePercentCharge - Percent Charge line type
5.CON.TypePercentDiscount - Percent Discount line type
6.CON.TypeProductService - Product/Service line type
7.CON.TypeRunningSubtotal - Running Subtotal line type
8.CON.TypeSectionHeader - Section Header line type
9.CON.TypeSubtotal - Subtotal line type
10. CON.TypeSummary - Summary line type
To create a section that cycles through line items on a layout follow the below instructions. In this help file we describe how to print Comment, Heading, Subtotal, Running Subtotals, and Product/Service line types. The same process can be followed to print other line types by using the appropriate constant above in your print if statement.
Inserting a Section
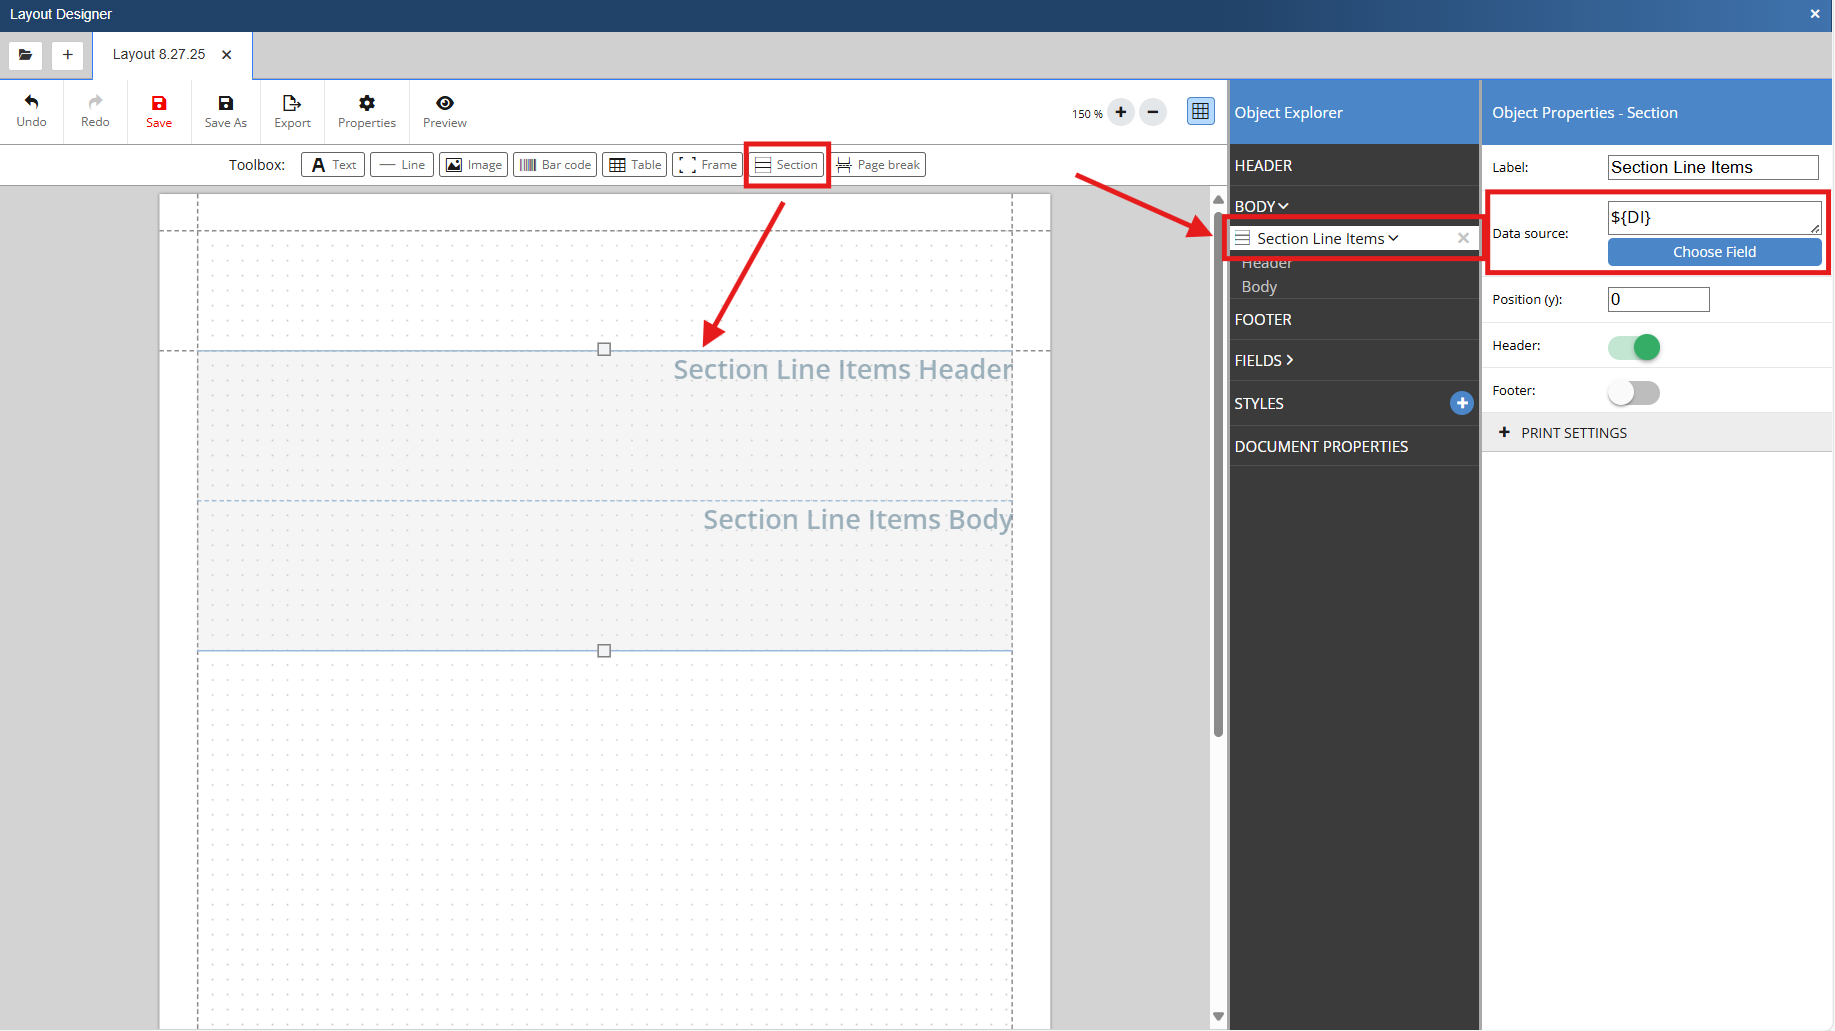
1. Insert a section on the layout by clicking on the section icon and dragging it on to the layout. Notice that by default this section is named "Section Line Items" and that its data source is listed as ${DI} which stands for the Document Items table.
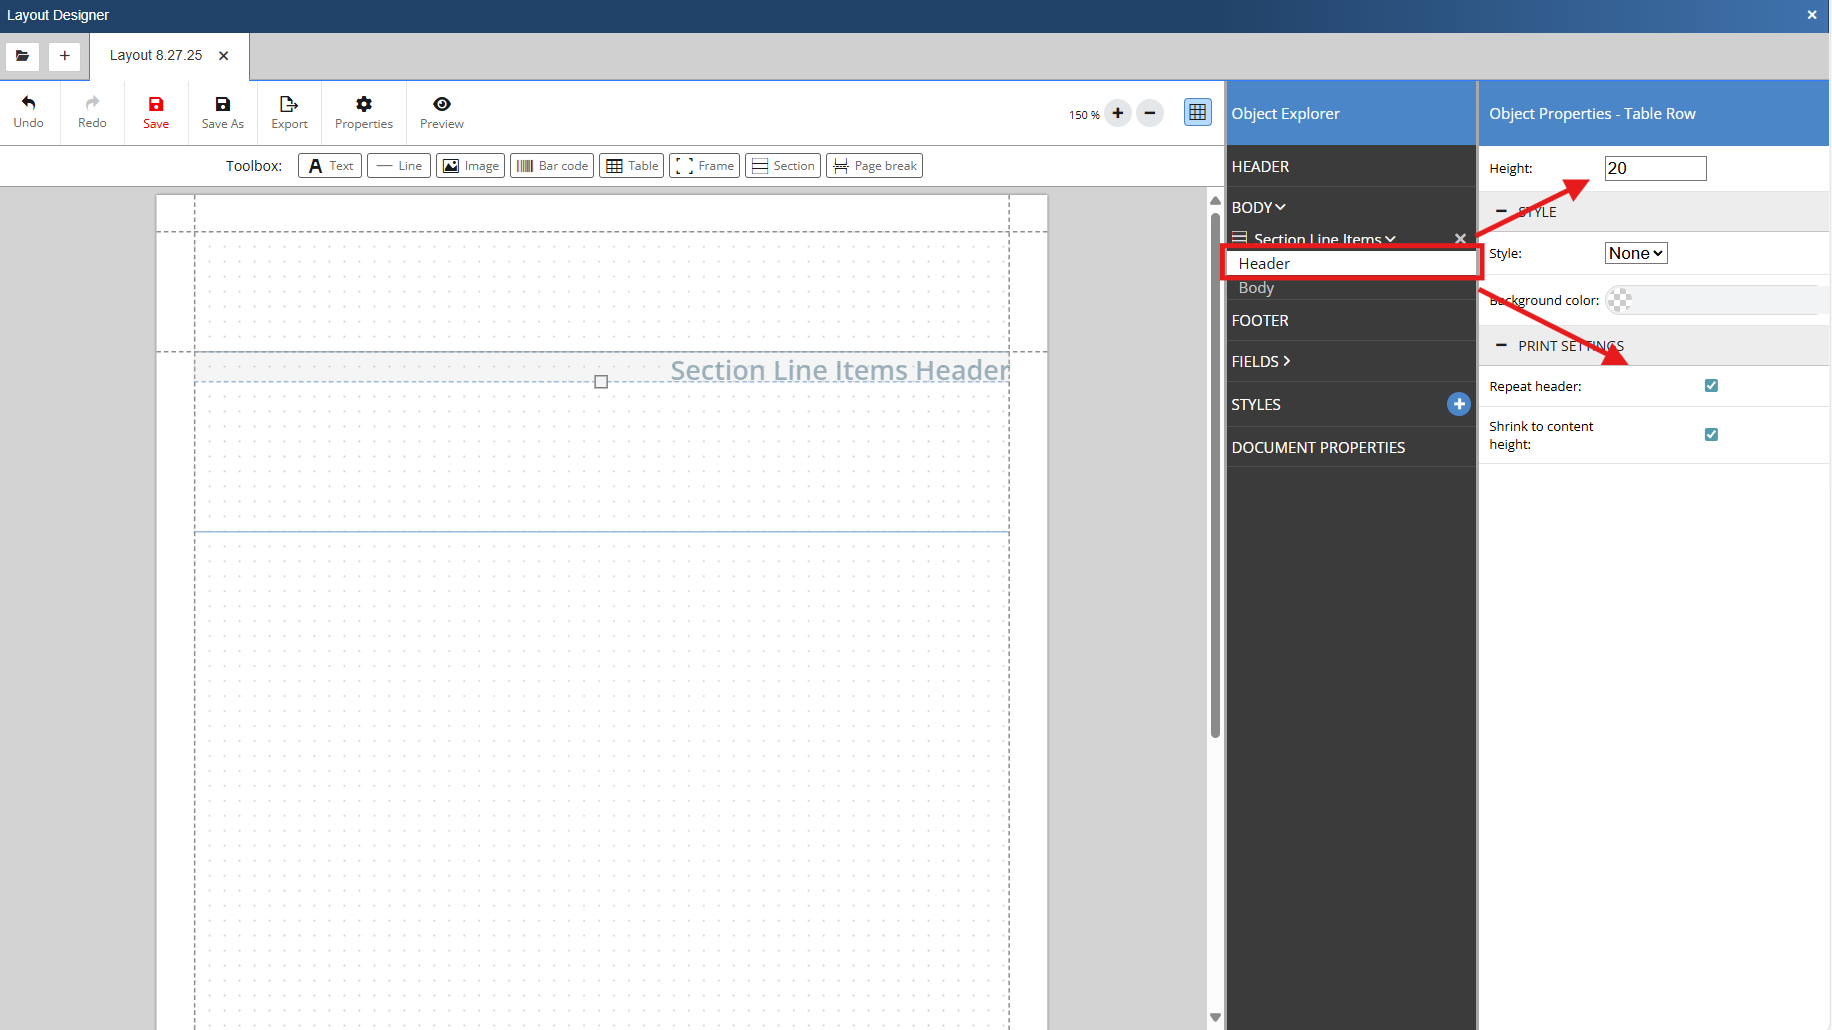
2. Click on the section header in the Object Explorer and adjust the Table Row Height to 20 in the Object Properties. Also make sure that Repeat header and Shrink to content height are selected.
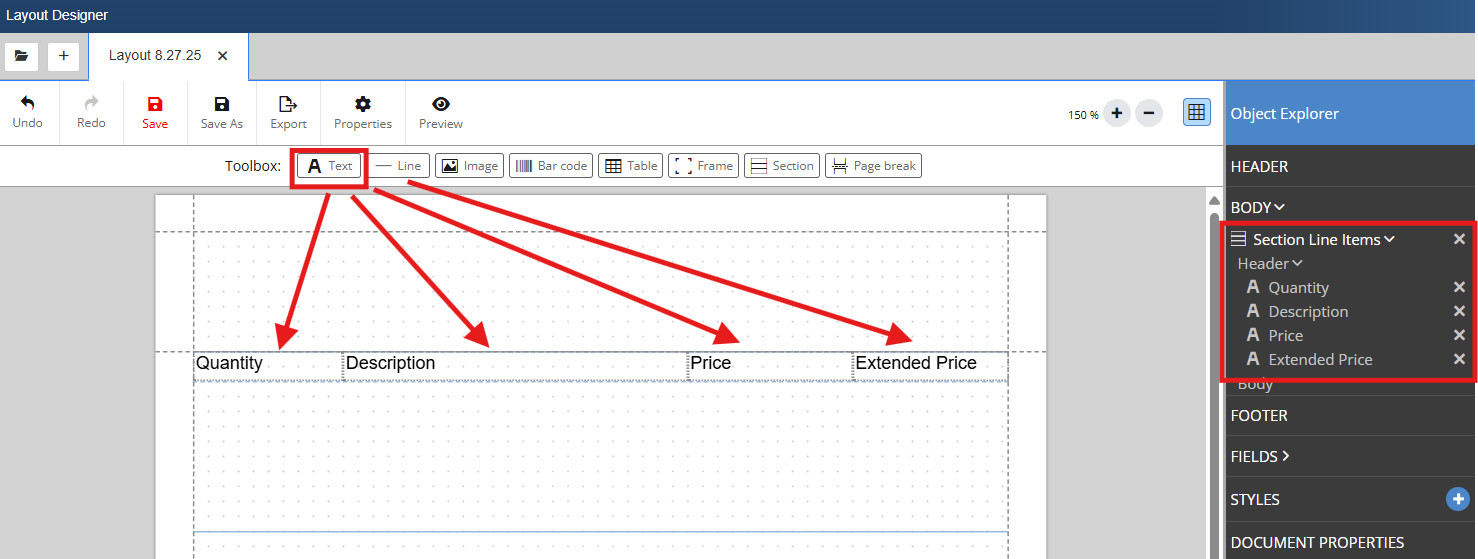
3. Insert text boxes that span across the header with labels for each column you would like to include in the layout. This is done by clicking on the Text icon and dragging it on to the layout. Note that as you do so these objects are created in the Object Explorer.
Inserting a Frame
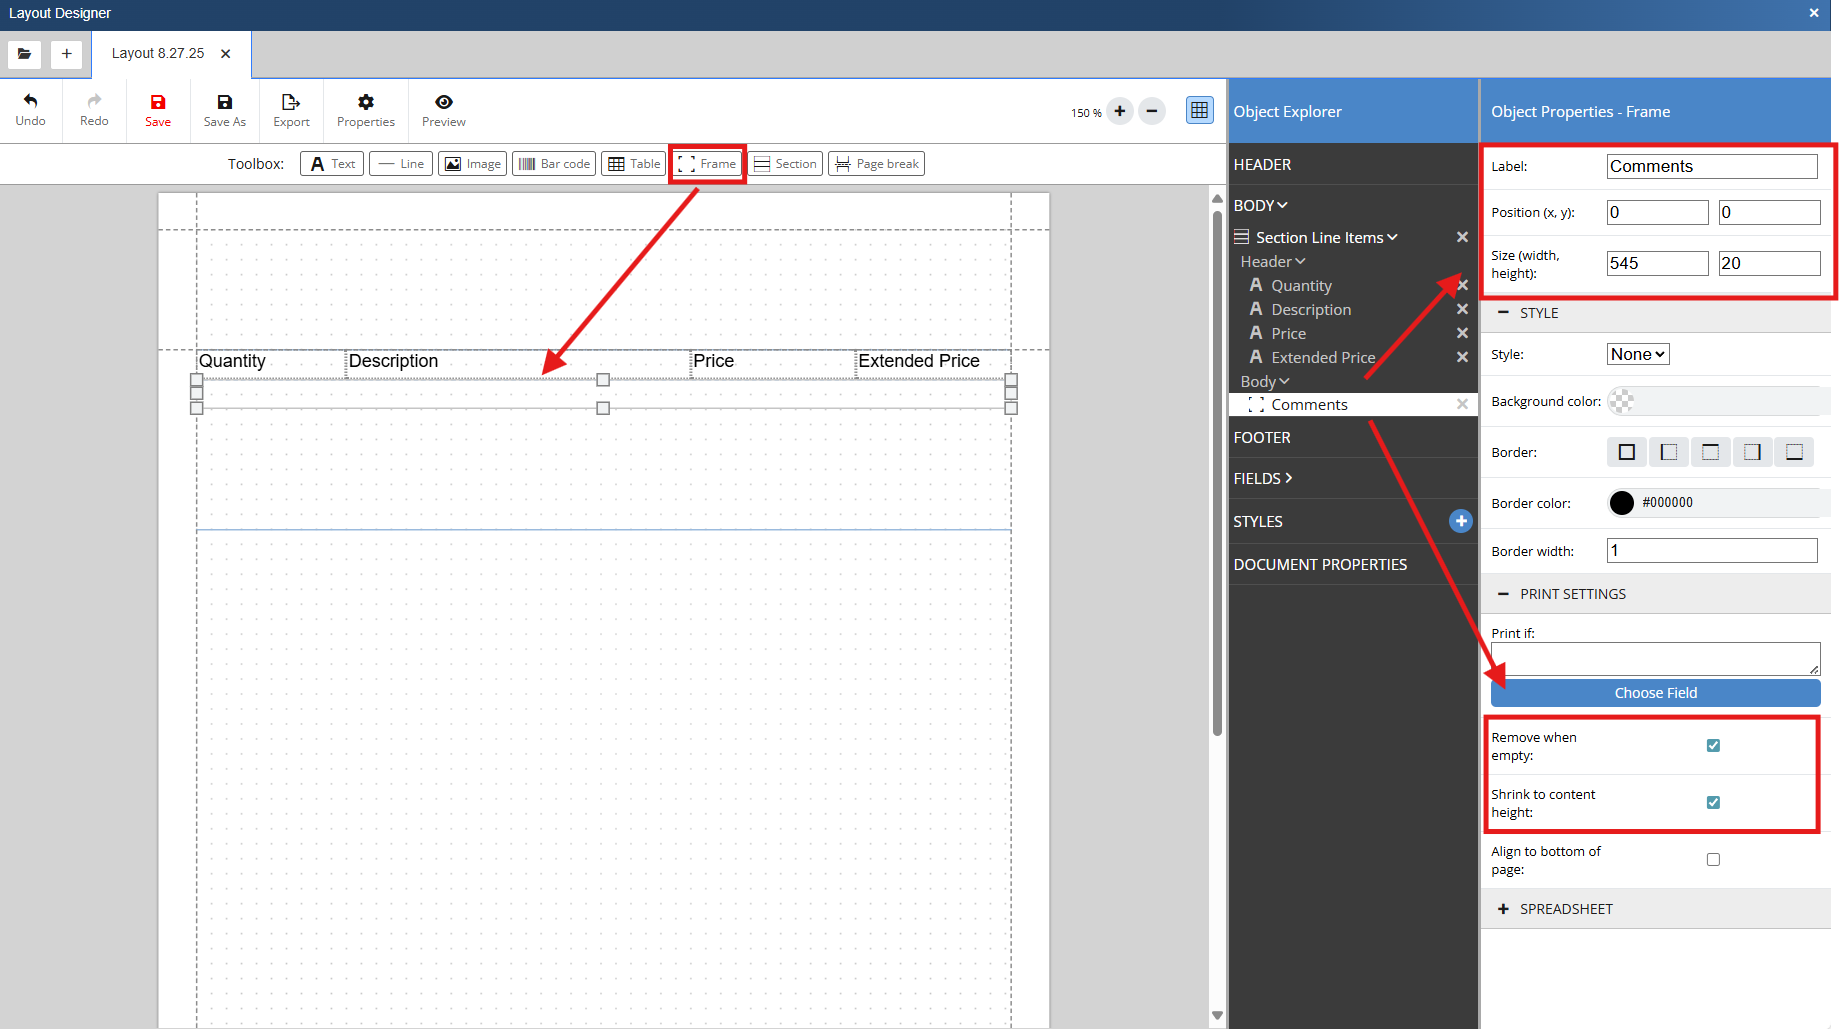
4. Insert a frame into the body of the section by clicking on the Frame icon and dragging it on to the layout. Using the sizing handles expand the frame to span the width of the layout and adjust the height of the frame to 20. Click into the label field in the Object Properties and give the frame a name. This frame will hold the table that will print our Comment line types so we will name this Comments. Make sure that Remove when empty and Shrink to content height are both checked.
Inserting a Table
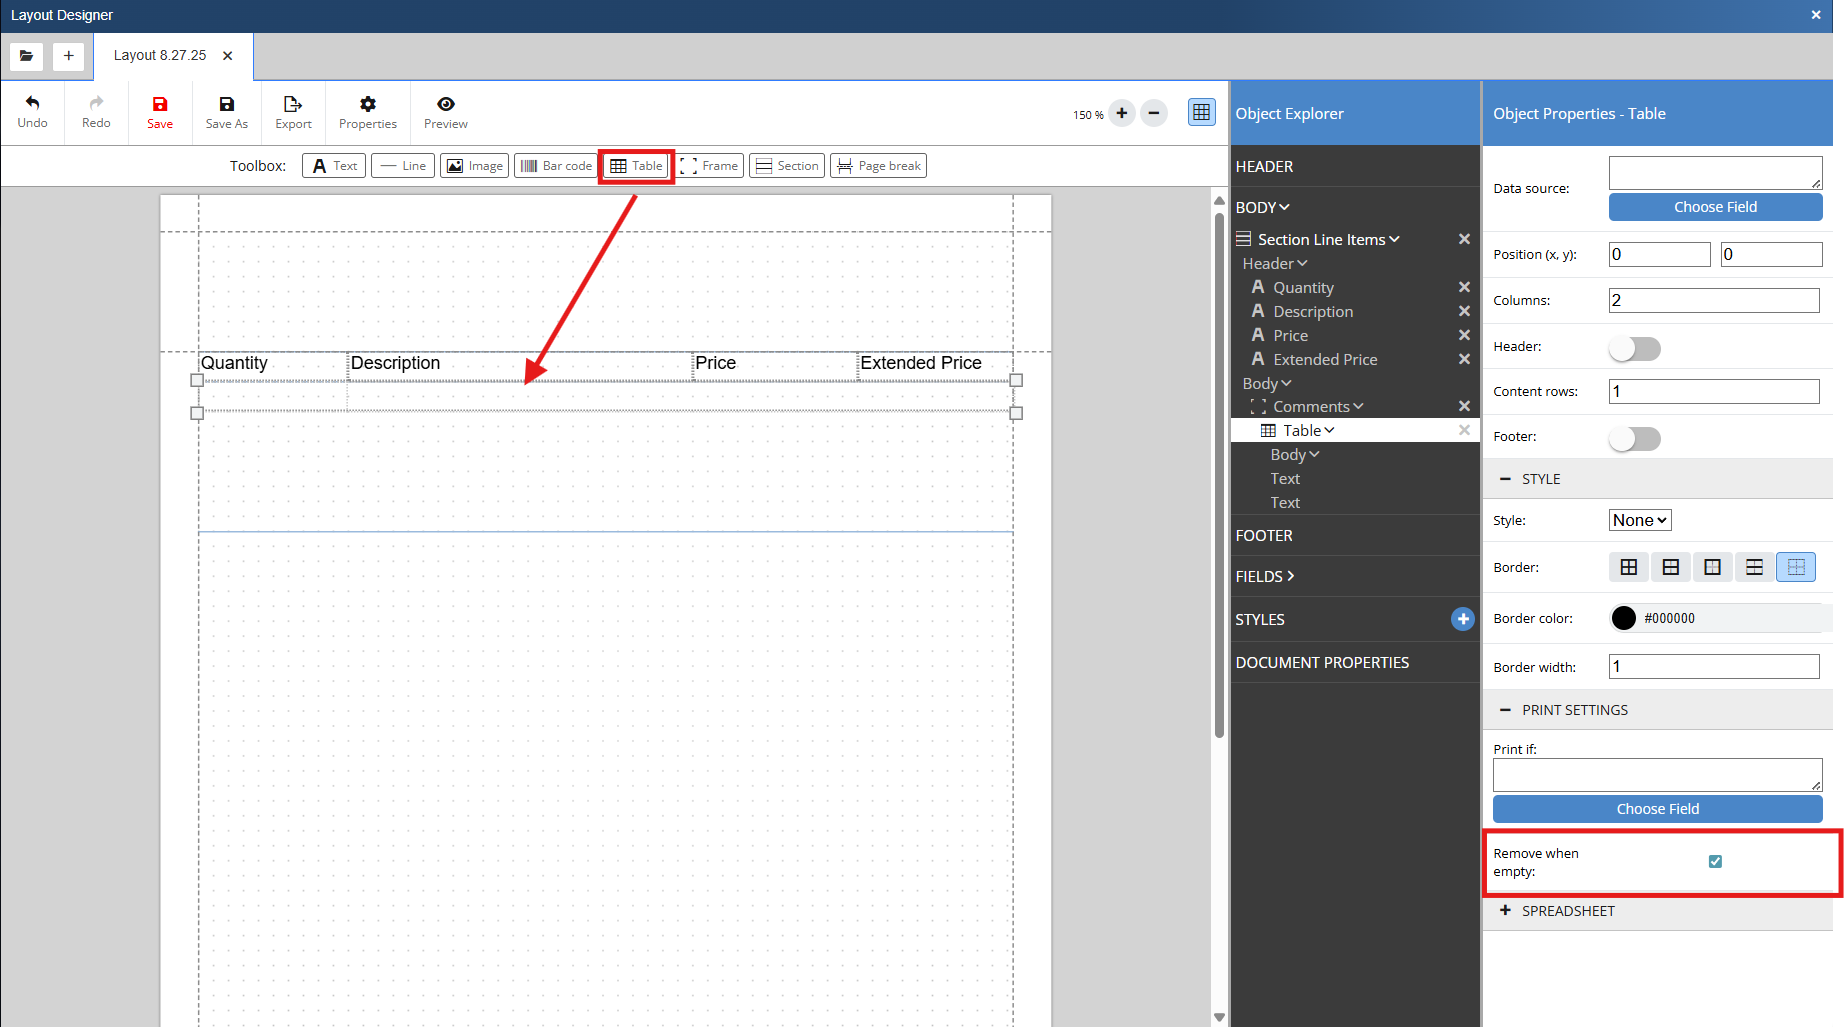
5. Insert a Table into the Comments frame by dragging the Table icon into the frame directly below the header. Toggle the header off, remove the borders and resize the table cells to span the width of the layout. Make sure that remove when empty is selected.
Creating a Print If Statement - Comments
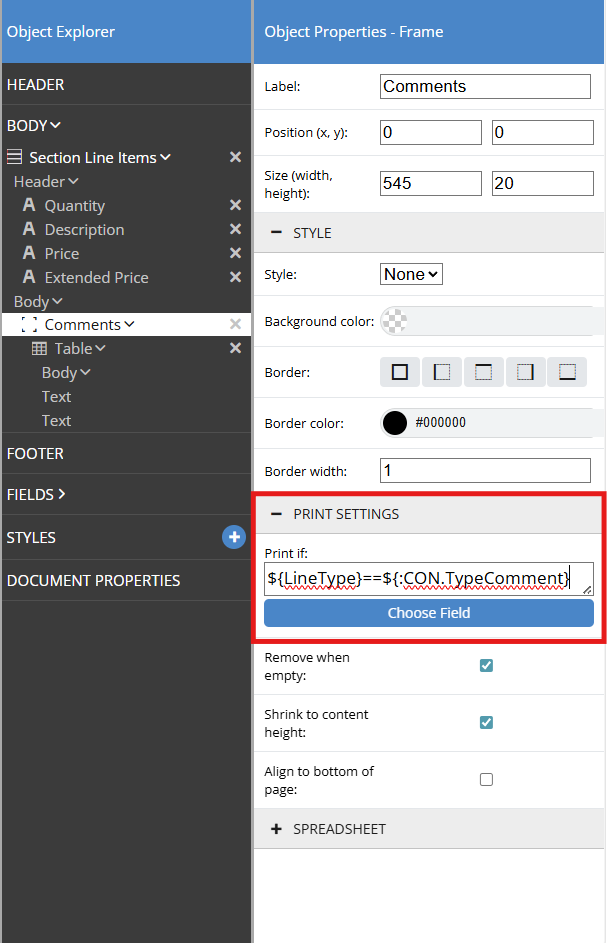
6. Create a Print If statement by clicking on the Comments frame we created and clicking on choose field under the print settings heading.
7. We only want Comment line types to print with this lines formatting so we will search for and select LineType. We will then insert 2 equal signs (==), which means equal to, click on choose field again, and search for comment. We will select CON.TypeComment and it will be inserted into the print if field after our equal signs.
The Print If statement for this Comments frame is ${LineType}==${:CON.TypeComment}. This will ensure that only line items with the comment line type will print using the formatting of this table.
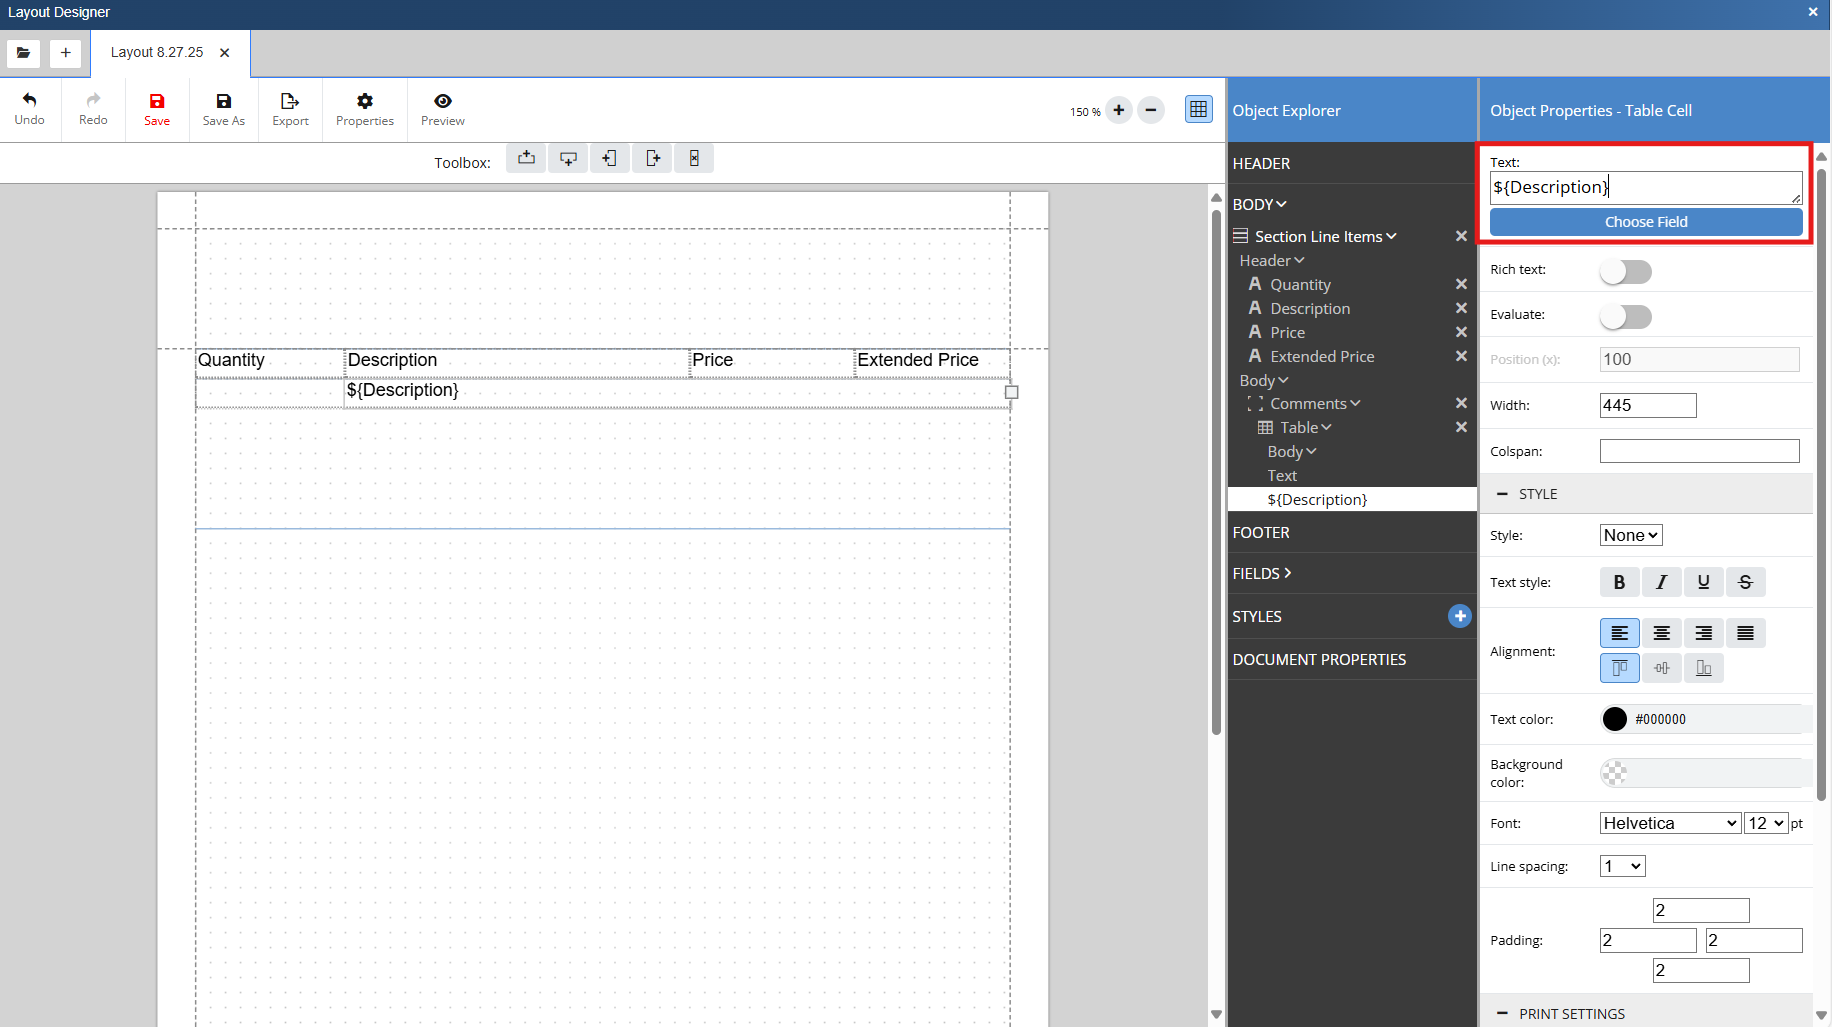
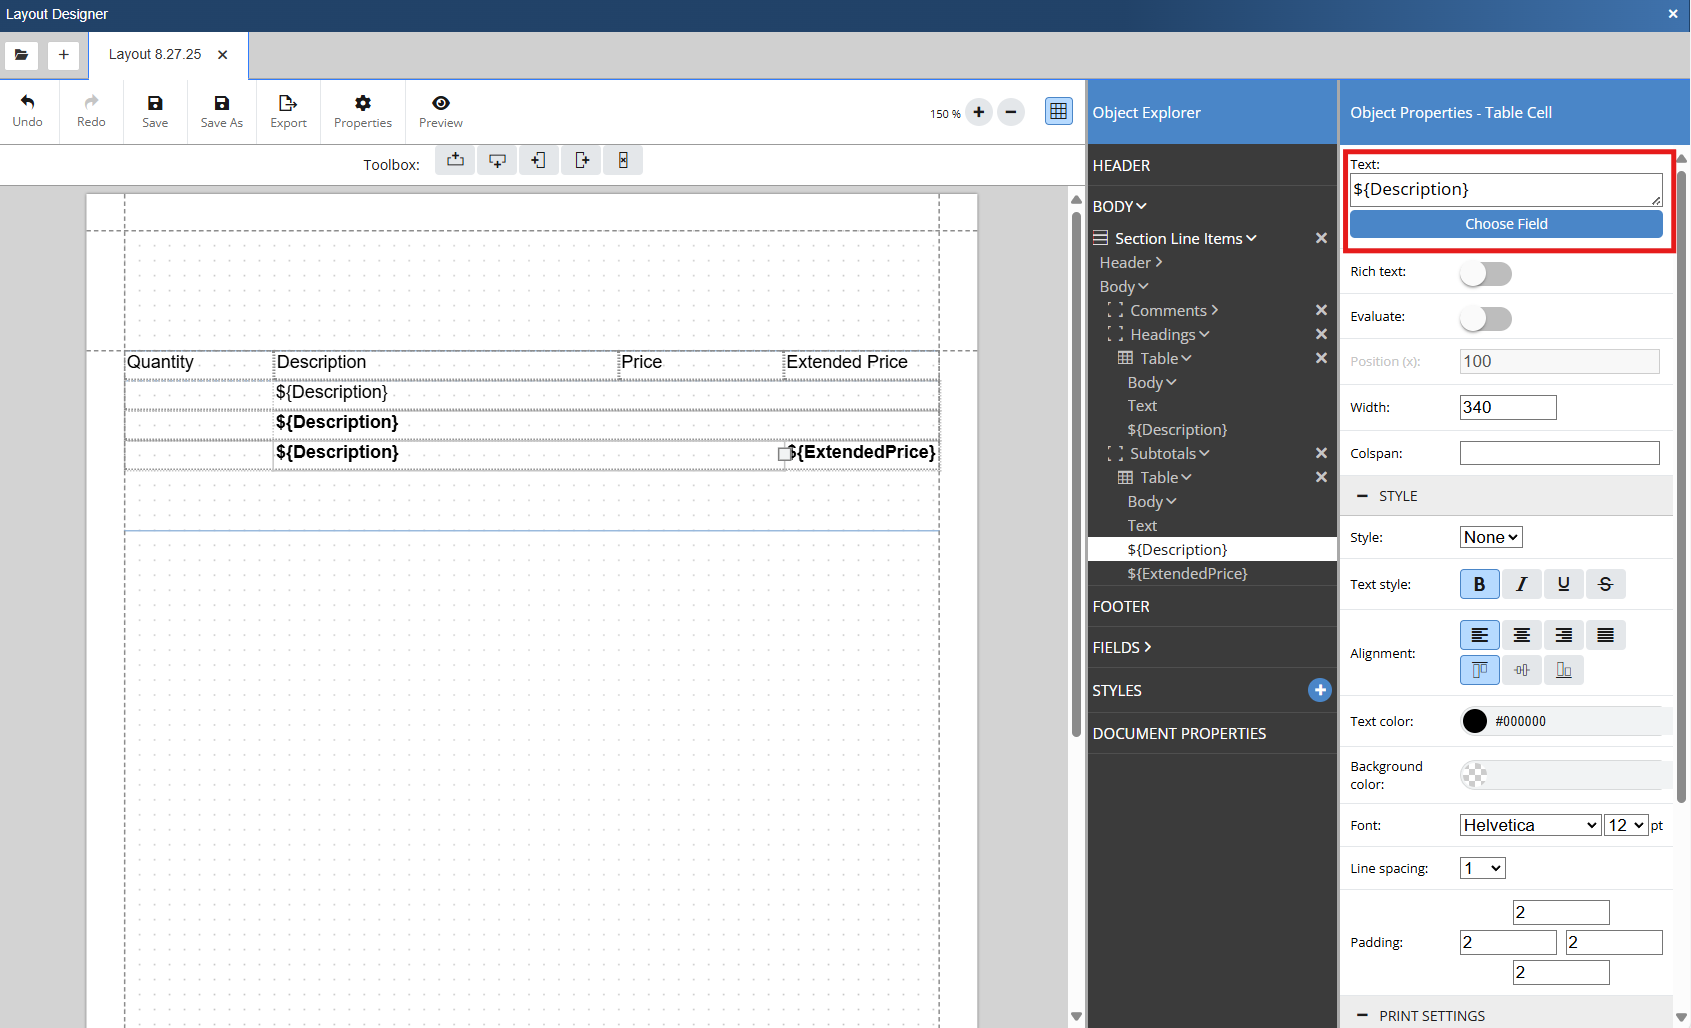
8. Double click into the second cell of the comments table. In the Object Properties for the Table Cell click on Choose Field under the Text box. Search for description and select Description from the DI table. This will insert the Description macro (${Description}) into the cell. When the Layout Designer encounters a comment line type it will print using this lines formatting and will insert the Description text from the document.
9. If you preview the document you can see that only Comment line types are printing on the layout. To have others print we will need to create more frames, tables, and print if statements.
Creating a Print If Statement - Headings
10. Repeat steps 4 and 5, but this time name the frame Headings.
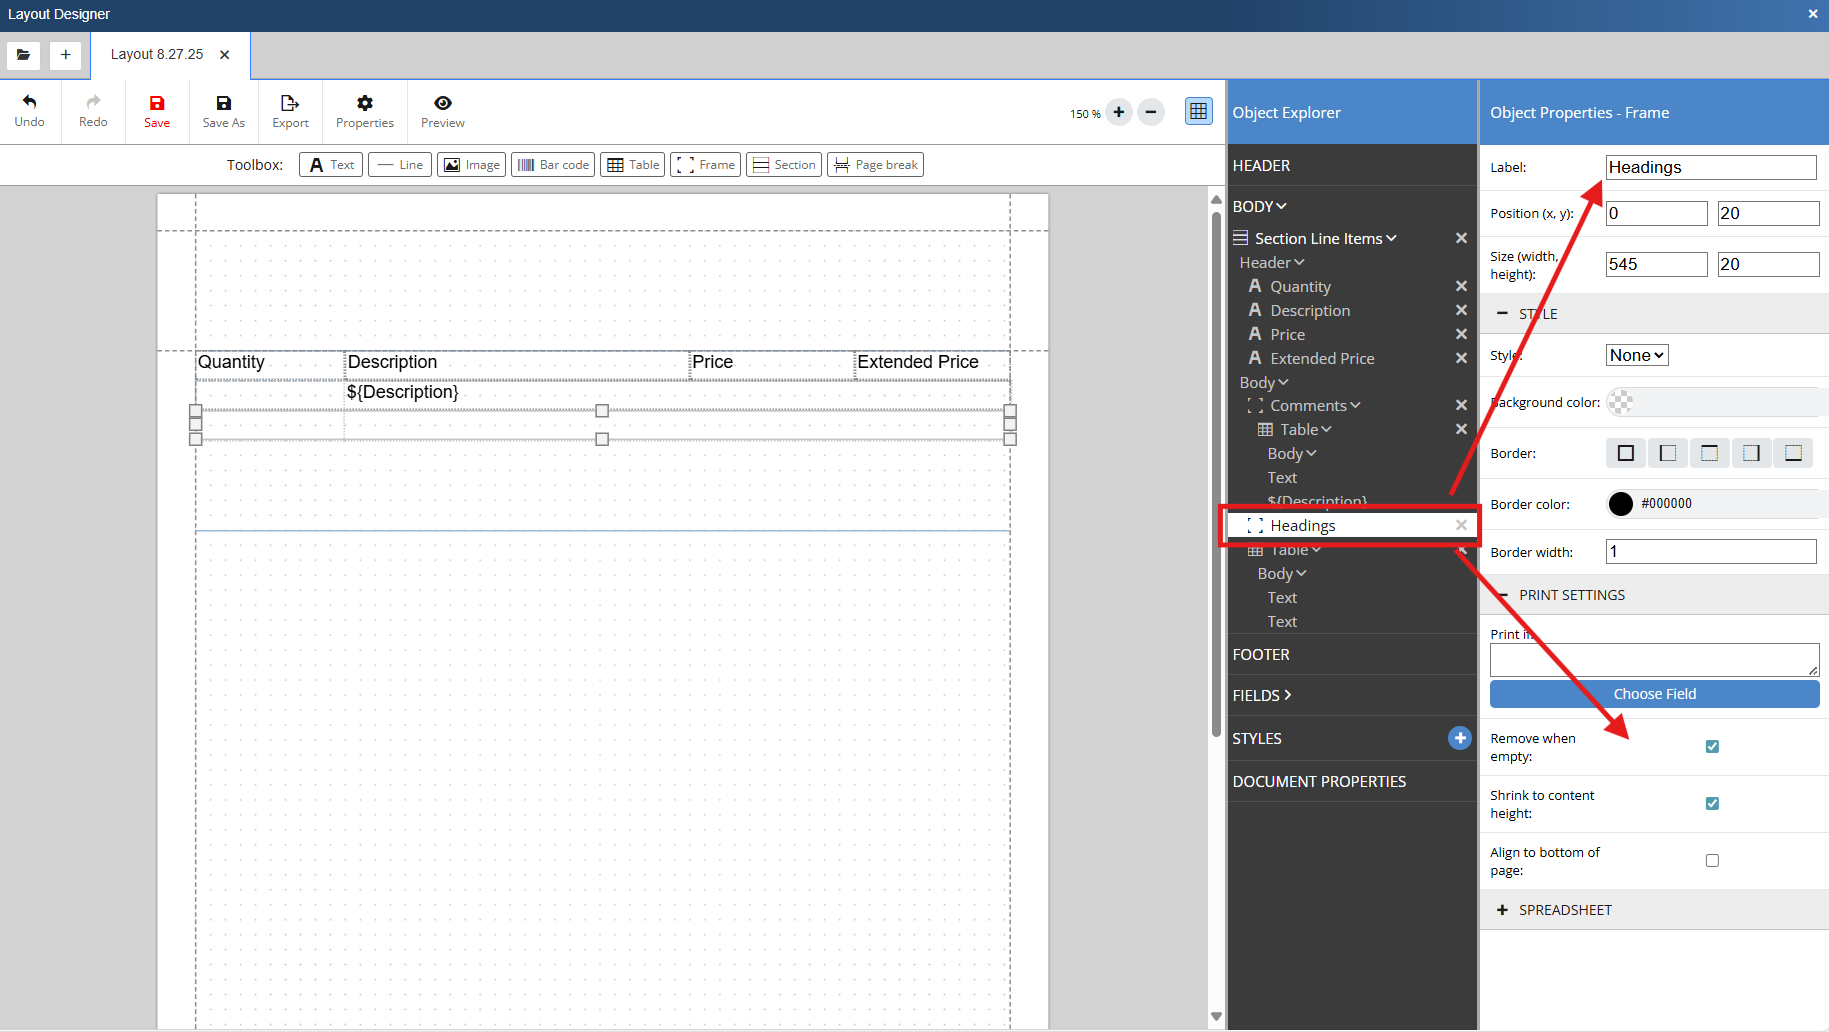
11. Create a Print If statement by clicking on frame we created and clicking on choose field under the print settings heading.
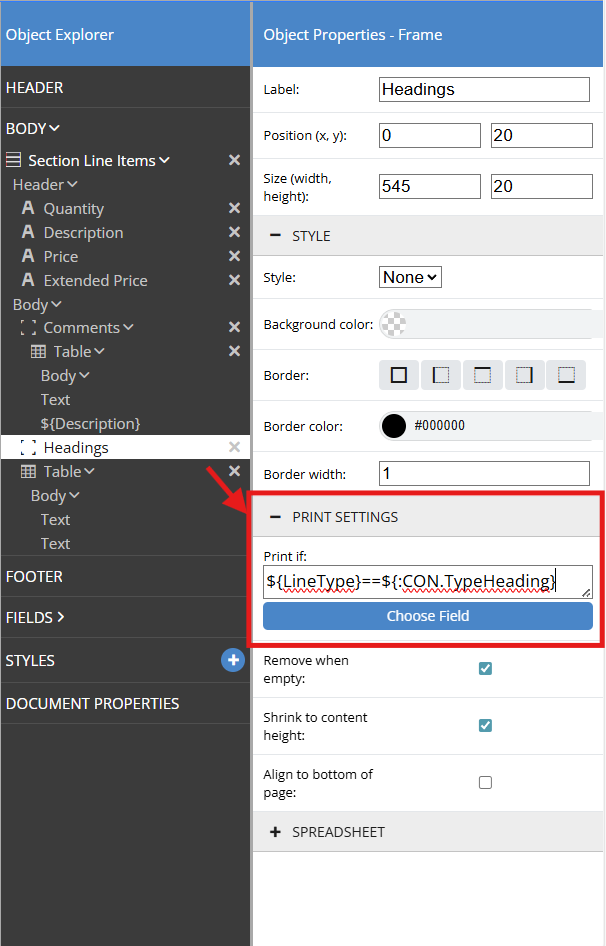
12. We only want Heading line types to print with this lines formatting so we will search for and select LineType. We will then insert 2 equal signs (==), which means equal to, click on choose field again, and search for Heading. We will select CON.TypeHeading and it will be inserted into the print if field after our equal signs.
The Print If statement for this Headings frame is ${LineType}==${:CON.TypeHeading}. This will ensure that only line items with the Header line type will print using the formatting of this table.
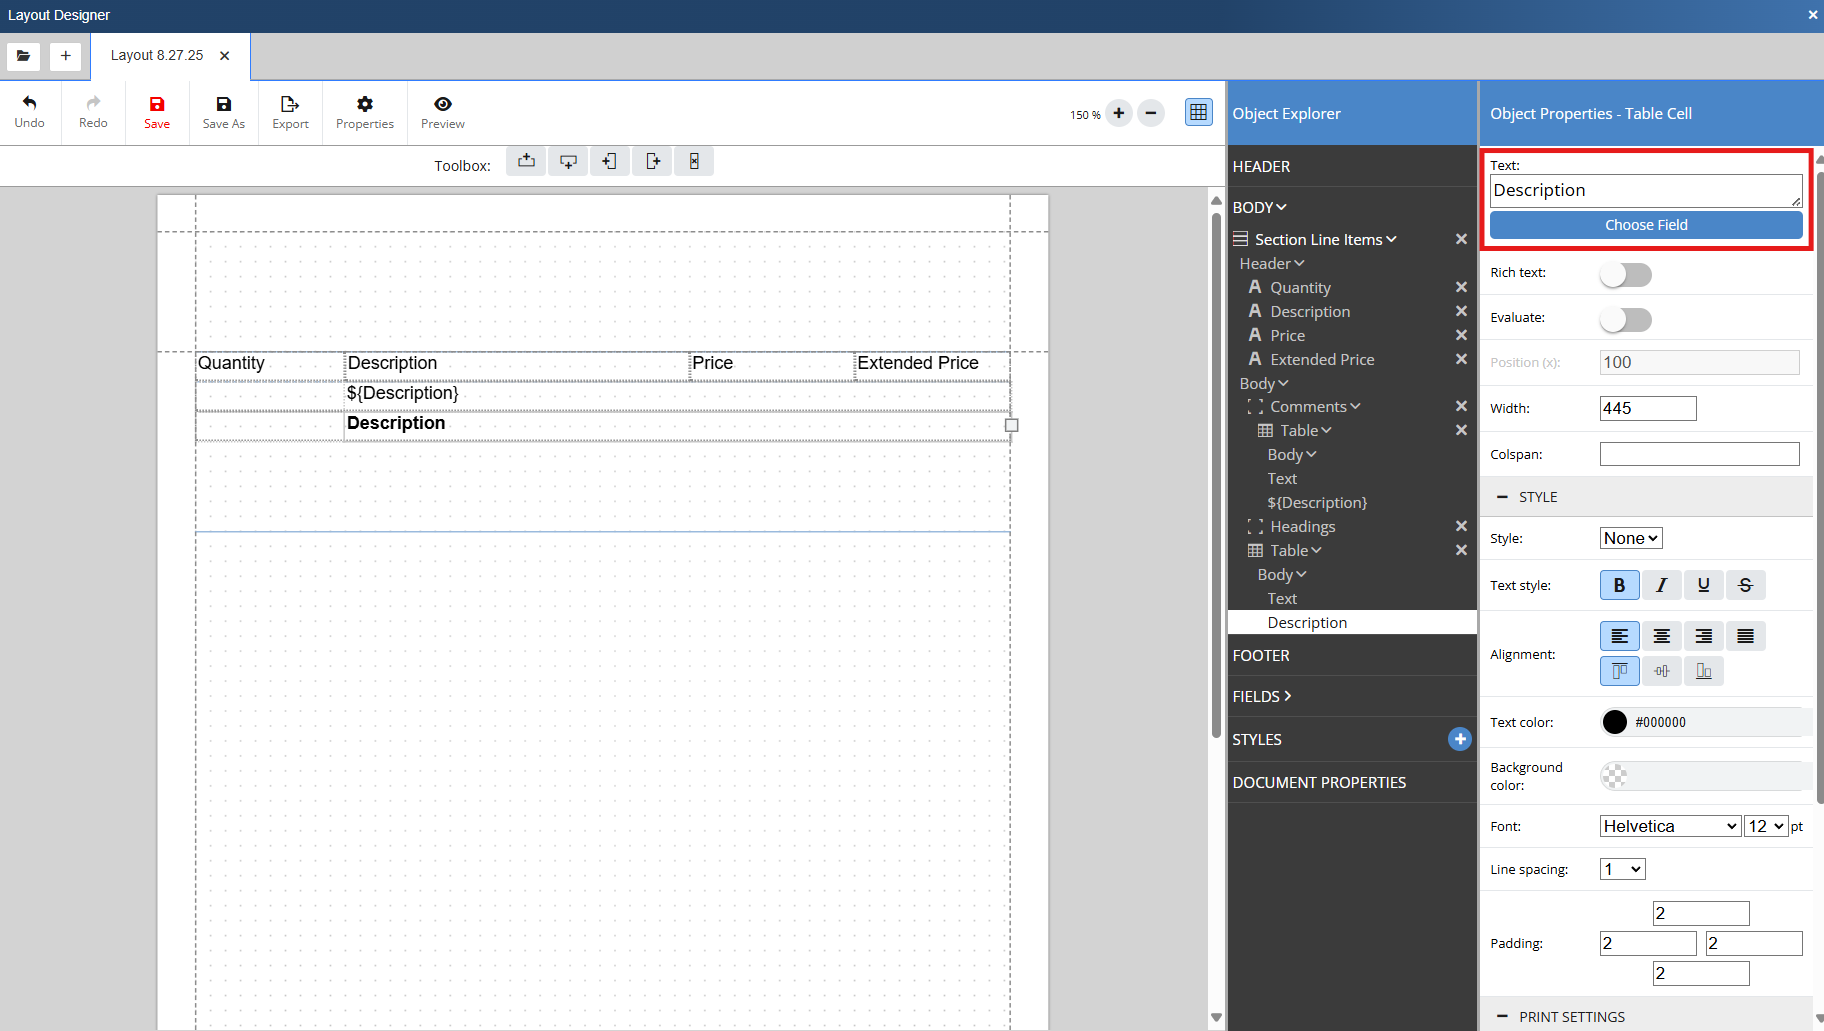
13. Double click into the second cell of the Headingd table. In the Object Properties for the Table Cell click on Choose Field under the Text box. Search for Description and select Description from the DI table. This will insert the Description macro (${Description}) into the cell. We will bold the text by selecting the bold text style under the style section in the Table Cell's Object Properties. When the Layout Designer encounters a Heading line type it will print using this lines formatting and will insert the bolded Description text from the document.
14. If you preview the document you can see that both Comment and Heading line types are printing on the layout. To have others print we will need to create more frames, tables, and print if statements.
Creating a Print If Statement - Subtotals and Running Subtotals
15. Repeat steps 4 and 5, but this time name the frame Subtotals. Adjust the number of columns in the table to 3 and resize and align the cells to the table above.
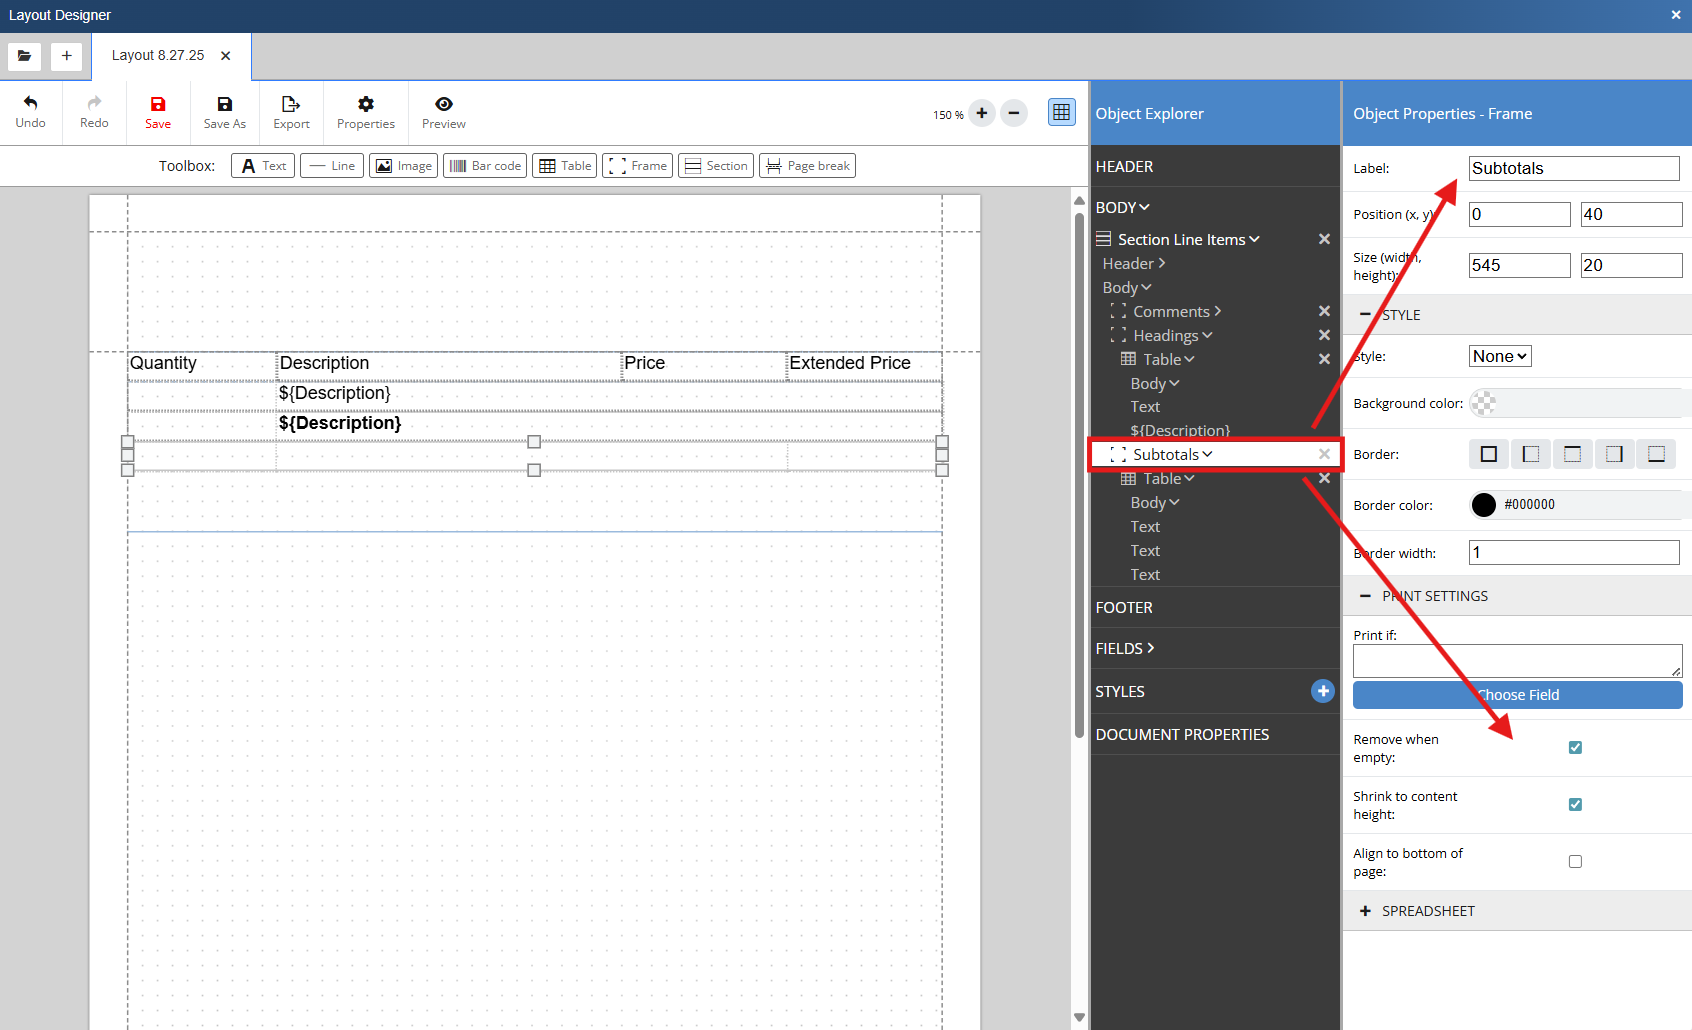
16. Create a Print If statement by clicking on frame we created and clicking on choose field under the print settings heading.
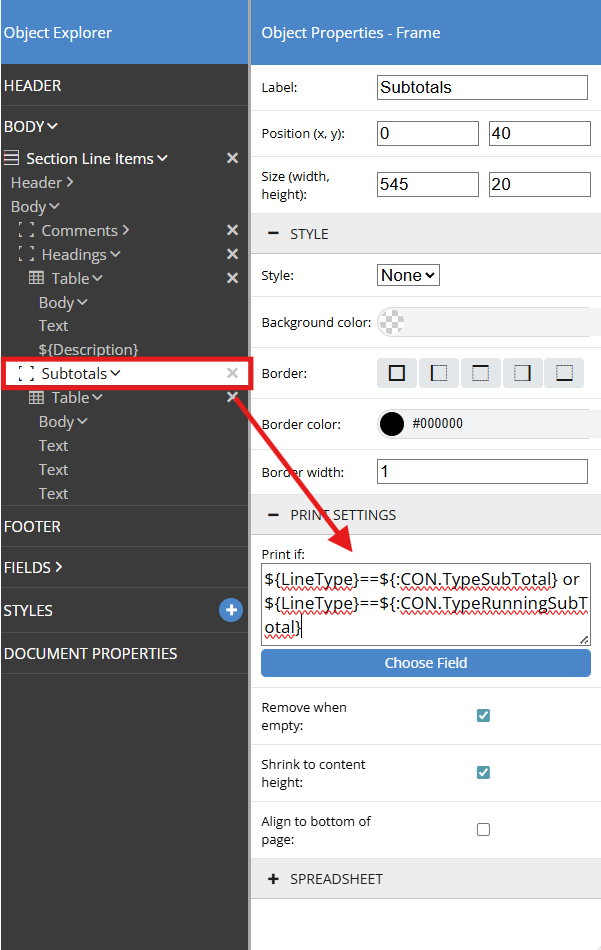
17. We only want Subtotal and Running Subtotal line types to print with this lines formatting so we will search for and select LineType. We will then insert 2 equal signs (==), which means equal to, click on choose field again, and search for Subtotal. We will select CON.TypeSubtotal and it will be inserted into the print if field after our equal signs. We will then insert a space and type in 'or' as we want this line to print when it is a Subtotal or Running Subtotal. After we insert the 'or' operator we will click on choose field again. We will search for and select LineType. We will then insert 2 equal signs (==), which means equal to, click on choose field again, and search for Running Subtotal. We will select CON.TypeRunningSubtotal and it will be inserted into the print if field after our equal signs.
The Print If statement for this Headings frame is ${LineType}==${:CON.TypeSubtotal} or ${LineType}==${:CON.TypeRunningSubtotal} . This will ensure that only line items with the Subtotal or Running Subtotal line type will print using the formatting of this table.
18. Double click into the second cell of the Subtotals table. In the Object Properties for the Table Cell click on Choose Field under the Text box. Search for Description and select Description from the DI table. This will insert the Description macro (${Description}) into the cell. Click into the cell to the right of the description cell. In the Object Properties for the Table Cell click on Choose Field under the Text box. Search for Extended Price and select Extended Price from the DI table. This will insert the Extended Price macro (${ExtendedPrice}) into the cell. We will bold the text by clicking on both cells while holding the shift key and selecting the bold text style under the style section in the Table Cell's Object Properties.
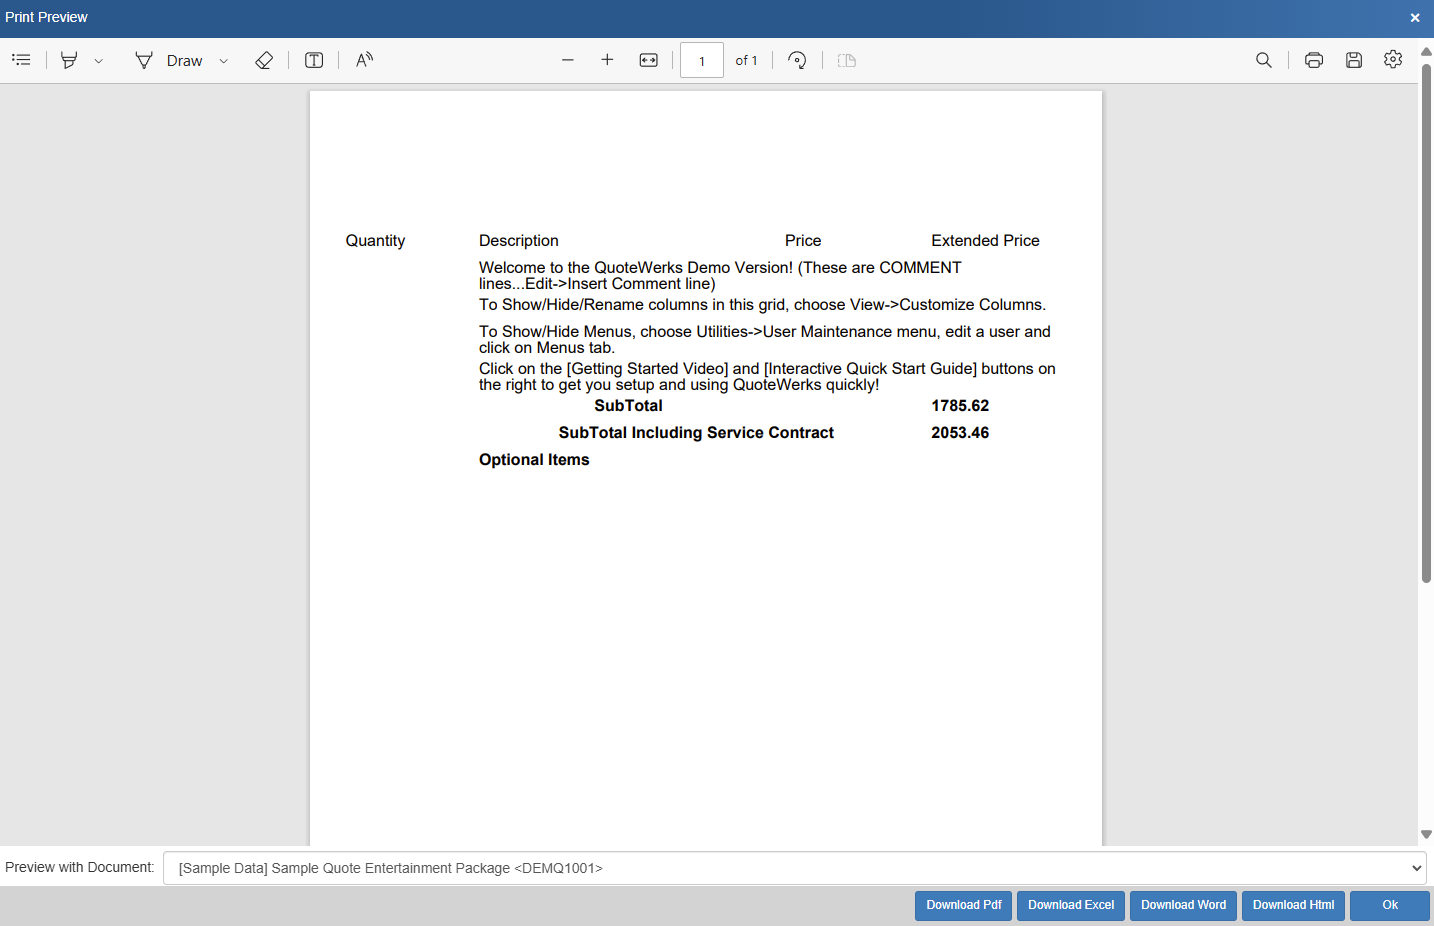
When the Layout Designer encounters a Subtotal or Running Subtotal line type it will print using this lines formatting and will insert the bolded Description text and subtotal value from the document.
19. If you preview the document you can see that Subtotal, Running Subtotal, Comment and Heading line types are printing on the layout. To have others print we will need to create more frames, tables, and print if statements.
Creating a Print If Statement - Product/Service
20. Repeat steps 4 and 5, but this time name the frame Product/Service. Adjust the number of columns in the table to 4 and resize and align the cells to the headers above.
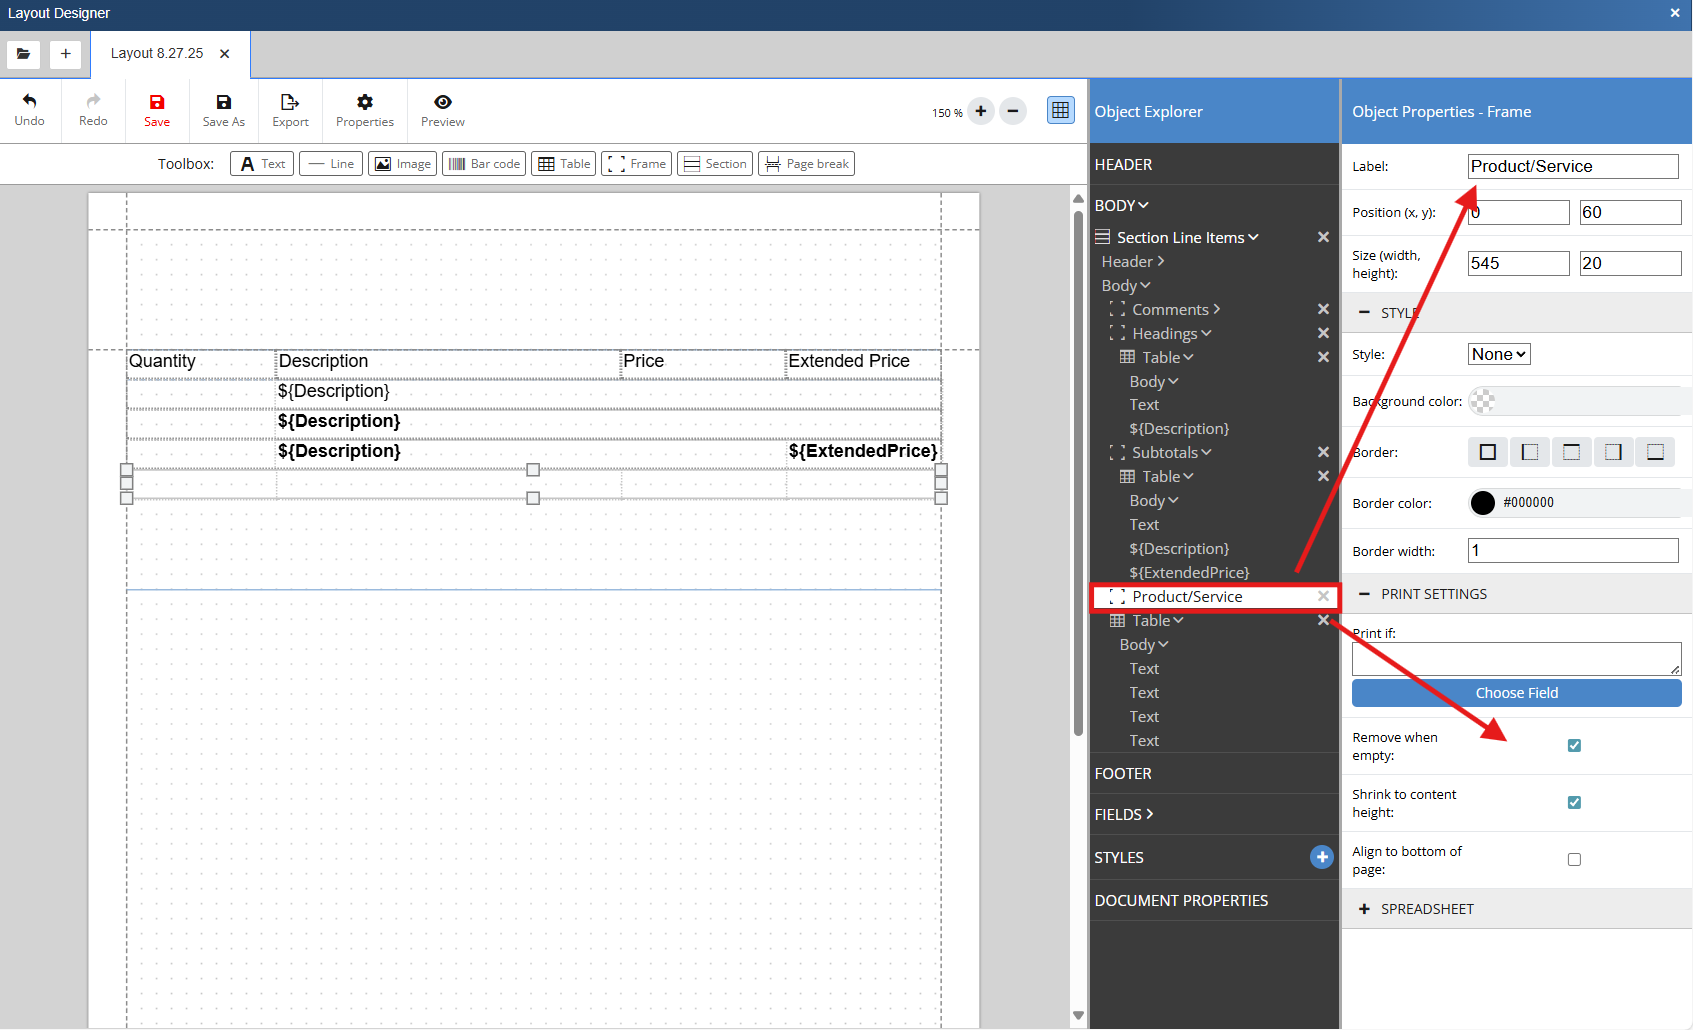
21. Create a Print If statement by clicking on frame we created and clicking on choose field under the print settings heading.
22. We only want Product/Service line types to print with this lines formatting so we will search for and select LineType. We will then insert 2 equal signs (==), which means equal to, click on choose field again, and search for ProductService. We will select CON.TypeProductService and it will be inserted into the print if field after our equal signs.
The Print If statement for this Product/Service frame is ${LineType}==${:CON.TypeProductService}. This will ensure that only line items with the Header line type will print using the formatting of this table.

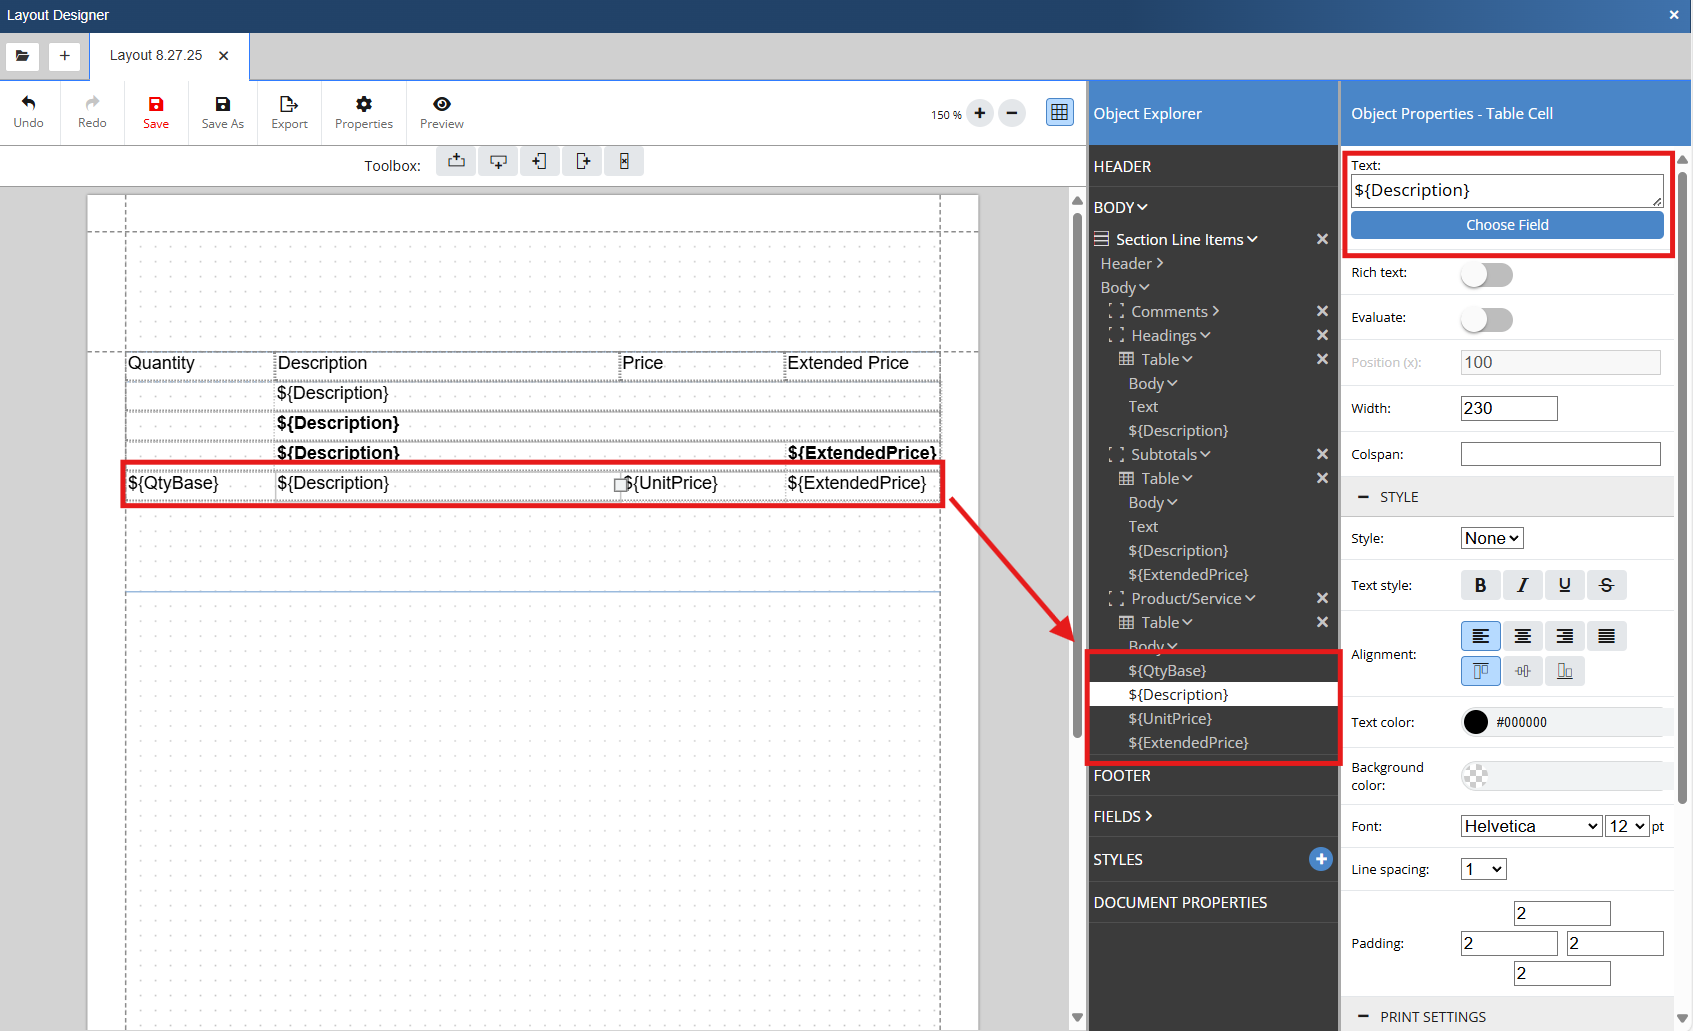
23. Double click into the first cell of the Product/Service table. In the Object Properties for the Table Cell click on Choose Field under the Text box. Search for QtyBase and select QtyBase from the DI table. This will insert the Quantity macro (${QtyBase}) into the cell.
Click into the cell to the right of the quantity cell. In the Object Properties for the Table Cell click on Choose Field under the Text box. Search for Description and select Description from the DI table. This will insert the Description macro (${Description}) into the cell.
Click into the cell to the right of the Description cell. In the Object Properties for the Table Cell click on Choose Field under the Text box. Search for Unit Price and select UnitPrice from the DI table. This will insert the Description macro (${UnitPrice}) into the cell.
Click into the cell to the right of the Unit Price cell. In the Object Properties for the Table Cell click on Choose Field under the Text box. Search for Extended Price and select ExtendedPrice from the DI table. This will insert the Description macro (${ExtendedPrice}) into the cell.
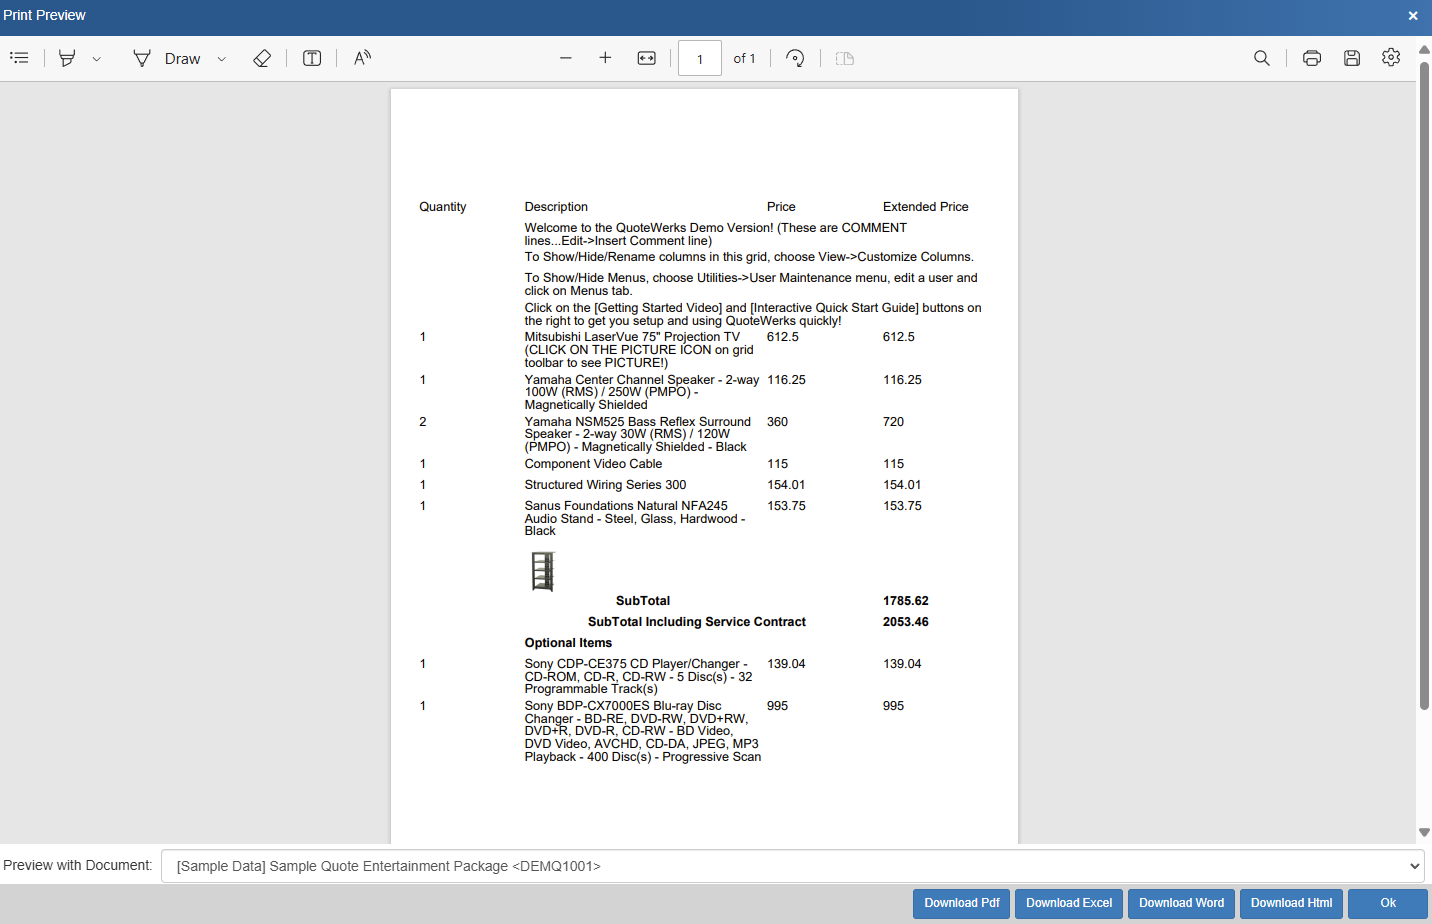
24. If you preview the document you can see that Product/Service, Subtotal, Running Subtotal, Comment and Heading line types are printing on the layout. To have others print we will need to create more frames, tables, and print if statements.

Creating a Print If Statement - Printing a Picture
20. Repeat step 4, but this time name the frame Product Picture.

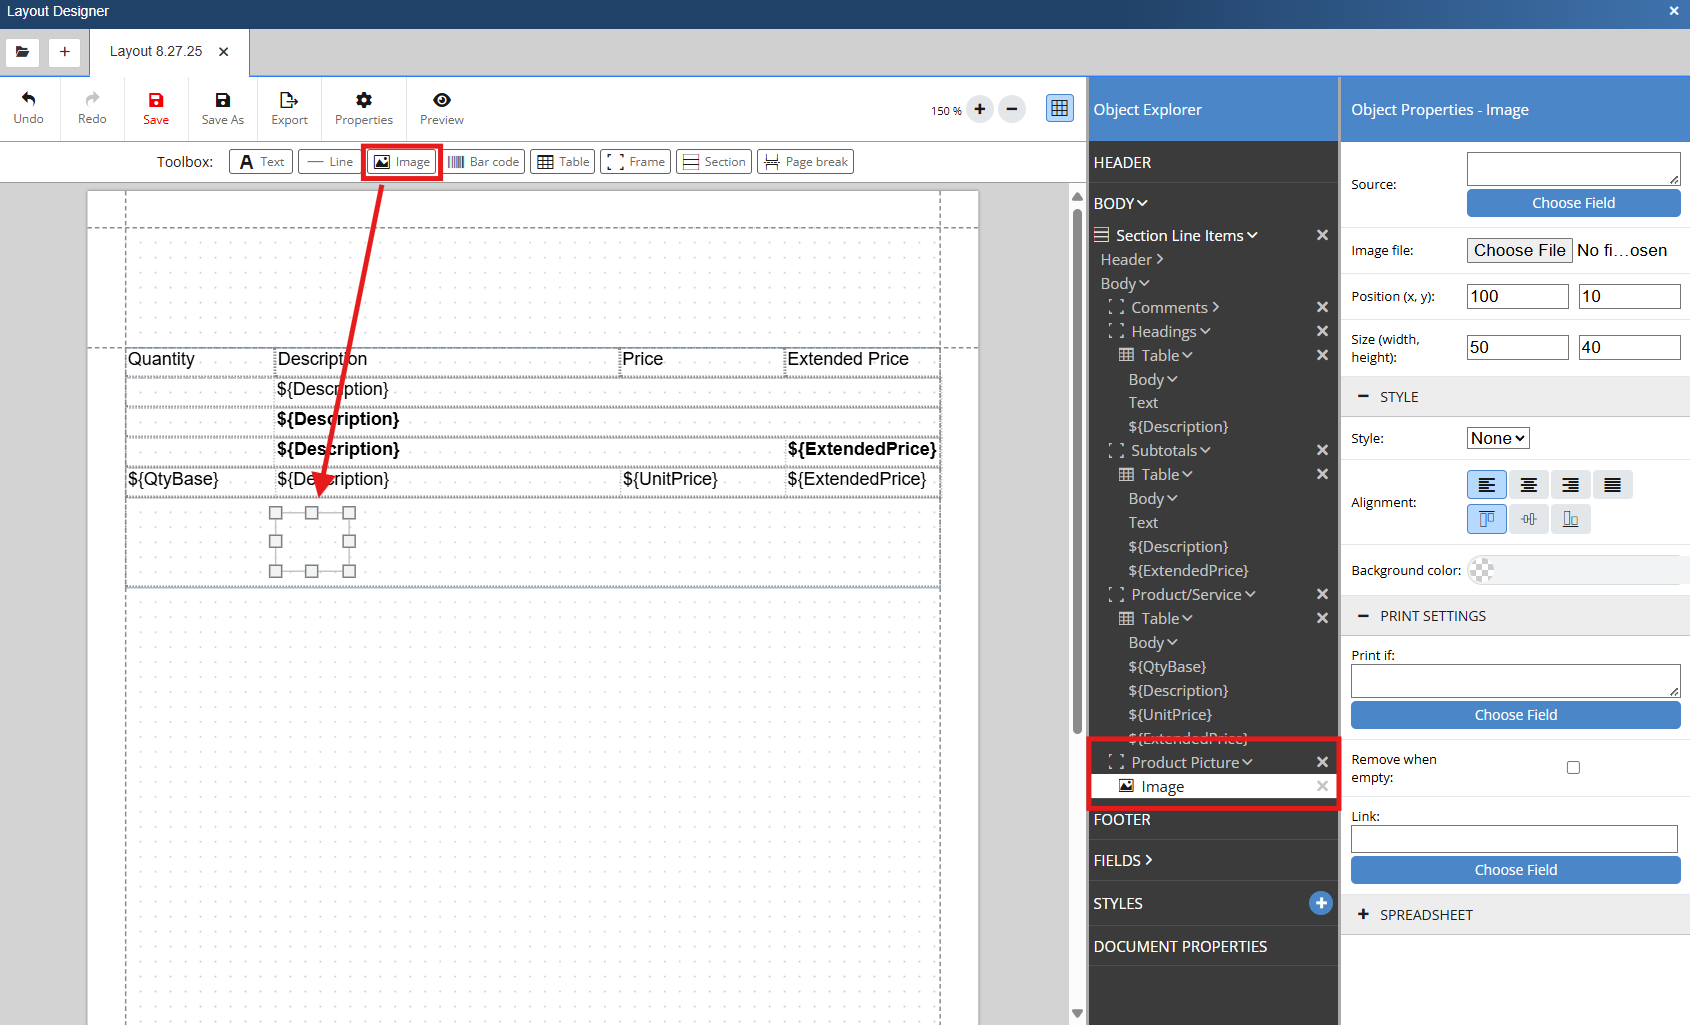
25. Select the image icon and drag in on to the layout. In our example we want to ensure that the image is included in the Product Picture Frame.
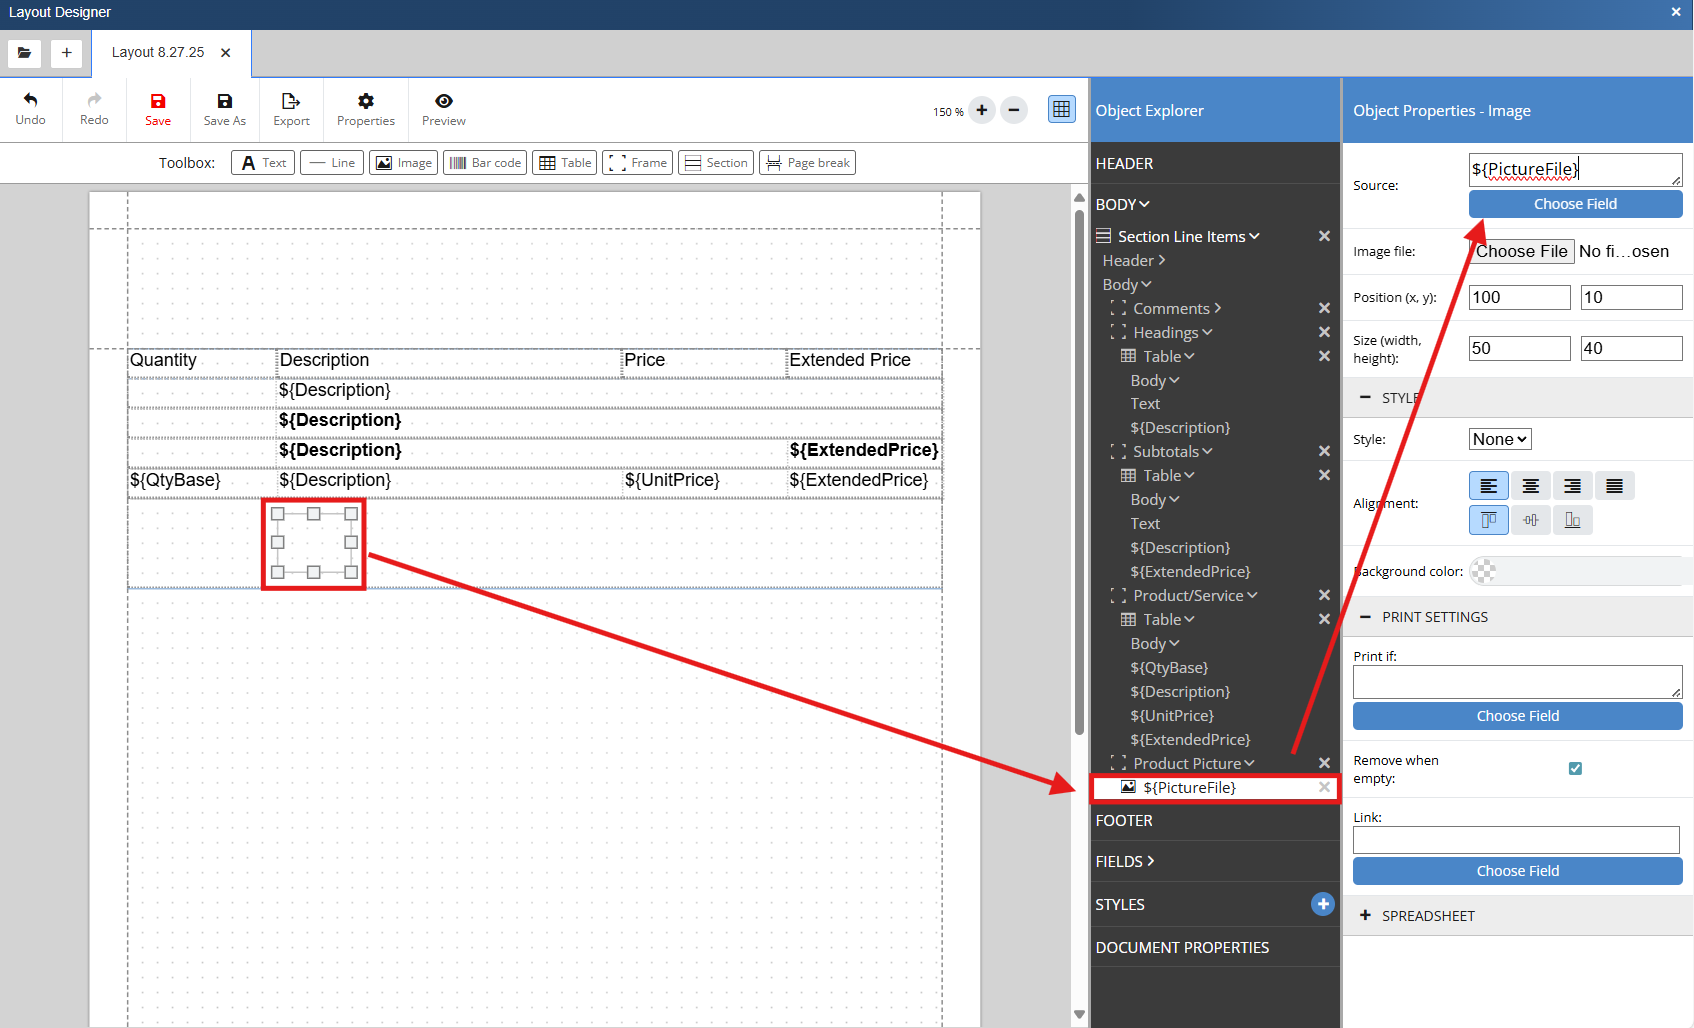
26. With the image object selected go to the object properties and click on choose field. Search for and select PictureFile.
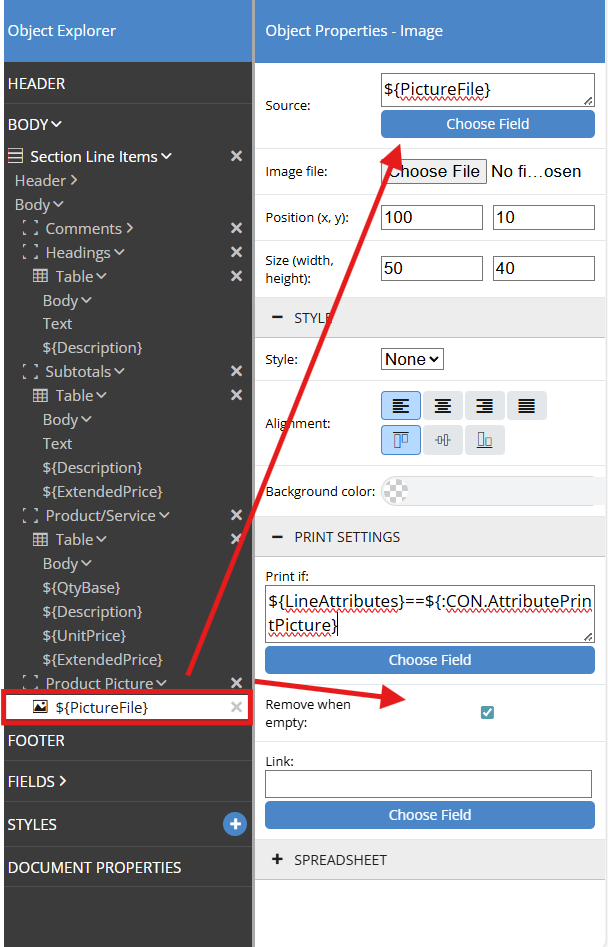
27. We only want the picture to print when the item has the print picture attribute selected and we can do this with a Print If statement. With the frame selected click on Choose Field under Print If in the print settings section of the image object properties. Search for and select Line Attributes. We will then insert 2 equal signs (==), which means equal to, click on choose field again, and search for Print Picture. We will select CON.AttributePrintPicture and it will be inserted into the print if field after our equal signs.
The Print If statement for this image is ${LineAttribute}==${:CON.AttriubutePrintPicture}. This will ensure that only line items with the Header line type will print using the formatting of this table.
28. If you preview the document you can see that Product/Service, Subtotal, Running Subtotal, Comment and Heading line types are printing on the layout along with the product picture.